Working with Timelines
Timeline Tabs
Across the top of the Timeline Window, you will see a tab for each timeline that you currently have open. This allows you to quickly switch between timelines that are currently being worked on. You can close a timeline using the ![]() button on its tab. This only closes the view of the timeline, the timeline isn't deleted.
button on its tab. This only closes the view of the timeline, the timeline isn't deleted.
To see all timelines in the project, go to the Manage option in the View toolbar.
Creating a timeline
To create a timeline, click New and a fresh set of blank rows will appear to the right of each Browser entry. Use the Timeline Properties pane to name the timeline and adjust the timeline length, if necessary.
The default timeline length is 5 minutes (timeline length is really just a user interface setting and can generally be left at the default value, or increased to provide more programming space).
The New option also allows you to easily create a timeline with the settings for:
- Default timeline (internal time source)
- Real Time Timeline (24hr timeline with real time time source)
- Astronomical Timeline (24hr timeline including Sunrise and Sunset Waypoints)
- Timecode Timeline (time source set to timecode)
- Audio Timeline (time source set to audio)
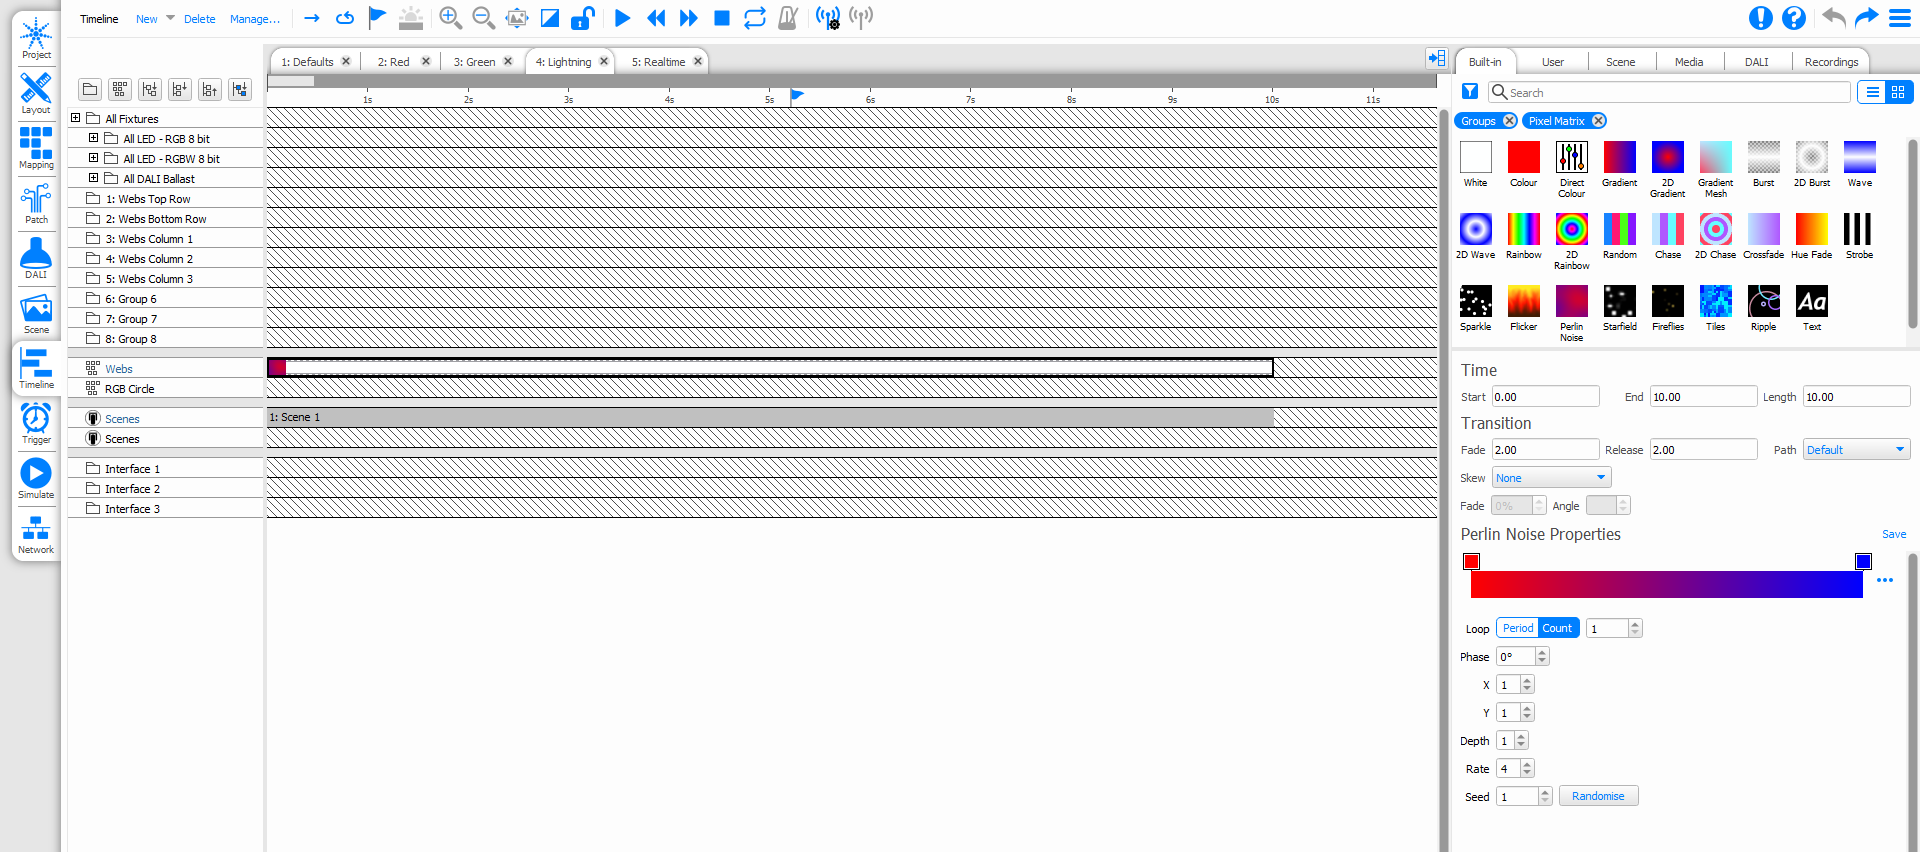
Timeline row categories
There are five categories of timeline row which determine the preset type that can be deployed on them.
When you attempt to add a preset to the timeline, rows that the preset cannot be applied to will be dimmed.
 Groups and fixtures
The majority of the timeline rows will be your groups of fixtures, the All... groups created by the system as you added fixtures and the groups you made to organise your programming. Only certain presets can be applied to this category. Click the plus sign to expand a group and expose its members:
![]() A fixture, or element within a compound fixture, capable of colour mixing, for example an RGB LED or automated light with CMY colour mixing. Use the Group colour presets to set static or dynamic intensity and colour.
A fixture, or element within a compound fixture, capable of colour mixing, for example an RGB LED or automated light with CMY colour mixing. Use the Group colour presets to set static or dynamic intensity and colour.
![]() A fixture incapable of colour mixing, for example a conventional light with/without a scroller or automated light with only a colour wheel. Use the Group intensity preset to set static or dynamic intensity. Create Mover presets to control the scroller or colour wheel as required.
A fixture incapable of colour mixing, for example a conventional light with/without a scroller or automated light with only a colour wheel. Use the Group intensity preset to set static or dynamic intensity. Create Mover presets to control the scroller or colour wheel as required.
 Matrices
These are the Pixel Matrices created in Setup and Mapping, only certain presets can be applied to this category. In many ways, creating matrices and working with these powerful presets is the preferred way to go with Designer.
 Scene
Scene
Unlike the categories above these rows do not specify a fixture selection but are instead simply a placeholder for any Scenes created in the project. The fixture selection is a property of the Scenes depending as it does on the fixtures selected when the preset was created. More rows can be added as required by right-clicking in the Browser and selecting New Scenes Row, similarly to remove them.
 DALI
DALI
These rows are for the DALI ballasts and groups and will only appear if some DALI fixtures have been added to the project, see DALI. Note that each DALI interface has its own set of rows due to the restrictions of the DALI standard. Only DALI presets can be applied to this category.
 VLC
VLC/VLC+ Rows
These rows can be used to output content to the VLC content target and can accept Matrix or Media presets. The Content Target on a VLC is directly linked to the VLC layout, so any presets placed on this row will be output to the whole layout.
If using a VLC+, the row will be able to expand to show Secondary and Target 3-8 rows (where enabled). The controller row corresponds to the Primary Content Target. These refer to the content targets which can be created in the Composition Editor.
Audio Rows
There are two types of audio row possible within a timeline:
- Simulation Audio
- Controller Audio
Simulation Audio
Simulation audio rows are available if Simulation Audio is enabled in the Simulate Mode. Audio clips can be dropped onto this row to playback on your computer when simulating the timeline. This is not uploaded to the controller for use during playback.
Controller Audio
Controller Audio is available if an LPC X, VLC or VLC+ are in use in the project and the Timeline Audio feature has been enabled.
This audio will be played back by the controller, and output from the audio connectors on the rear of the controller.
 Pin audio rows
When enabled, audio rows remain in view - pinned to the bottom of the window - when the timeline is scrolled vertically.
Timeline row priorities
While the Latest Takes Precedent system determines what should be rendered and output as presets come and go over time, it is the order of the rows that determines what should be rendered and output should two or more presets with fixtures in common start simultaneously, with rows higher up the list taking precedent.
For example a fixture may be a member of two groups with a preset applied to both starting at the same time. In this case the fixture will render the preset for the group higher up the list. Groups can be reordered in the browser simply by dragging them to new positions, although this will affect all timelines.
Accordingly, simultaneous presets placed on groups and fixtures have a higher priority than presets placed on matrices.
Browser controls and feedback
The Browser toolbar provides controls for expanding and collapsing groups and compound fixtures as well as highlighting rows with programming. The Browser provides useful feedback as to which rows contain programming; elements, fixtures and groups will be displayed in blue, compound fixture or group headings will indicate the presence of any programming on members even when collapsed.
 Expand all
Expands all compound fixtures and groups so that all element rows are displayed. Items with programming will be shown in blue.
 Expand all groups
Expands only groups so that all fixture rows are displayed. Items with any programming, even on a concealed member, will be shown in blue.
 Collapse all
Collapses all so that only group rows are displayed. Groups with any programming, even on a concealed member, will be shown in blue.
 Hide unused
Use this filter to hide all the unused rows, press again to turn off. Only items with any programming, even on a concealed member, will be shown in blue.
Row height
Adjust the vertical height of browser groups and their timeline rows by holding Ctrl (Cmd) and scrolling the mouse wheel while the mouse is over the browser. The height of group rows and audio rows can be adjusted individually by performing this keyboard shortcut while holding the cursor over fixture groups or audio rows, respectively.
Selecting timelines
To choose which timelines are open for editing, go to the Manage option in the View toolbar. This will then display a dialog of all the timelines in the project. You can open a timeline by double clicking on it.
From this dialog you can also search your timeline list to narrow down the options within the timeline list.
Copying timelines
Timelines can be copied using the Copy button, the copy is a brand new instance that operates independently, useful for creating similar timelines.
Deleting timelines
Timelines can be deleted using the Delete button, a warning dialog will you prompt you to confirm.
Maintaining indefinite output
There are two ways of maintaining a timeline’s output beyond the end of the last preset. This is a particularly important feature for architectural use where a simple wall panel could be used to recall “scenes” at random which would remain active indefinitely until another is recalled:
 Hold
Hold
Press the Hold button to prevent the timeline from releasing at the end (the default). Presets will remain active until overridden, effects and media will continue to play. Press the button again to reinstate the release.
 Loop
Loop
In Default and Audio Timelines, Press the Loop Timeline button to make a timeline loop indefinitely. If using a time source other than internal, setting to loop will allow the timeline to run again next time the timecode occurs. This is useful if you want to loop a sequence of presets immediately, or every time the timecode is used, or every day. Press the button again to remove the loop.
 Release at End
In Real Time, Astronomical and Timecode Timelines, Release at End can be used to prevent a timeline from replaying when the time source loops. By default, when the time source loops, the timeline while go back to the start to stay in sync with the time source (e.g. real time across midnight). This can be disabled using the Release at End option
It's also worth noting that a Timeline Running condition won't detect timelines that are holding at end. A Timeline Onstage condition will detect a looping or held at end timeline as long as the timeline is affecting the output of at least one fixture. Timeline Started and Timeline Ended triggers will match whenever a looping timeline loops. A Timeline Ended trigger will never match a timeline that is holding at end.
NOTE: Projects with lots of timelines set to Hold or Loop can eventually overwhelm the Controller(s) if these timelines are not explicitly released when no longer required.
 Flags
Flags
Flags can be dropped onto timelines for use with triggers to create more complex presentations; perhaps incorporating remote sensors and conditional logic or triggering show control or AV equipment.
To set a flag, press the Add Flag button and drop it onto the timeline ruler at the required position. Hold down Ctrl (Cmd) while pressing Add Trigger Flag to drop multiple flags in a single session, press the button again to finish.
To Edit or Delete a flag, click on the flag that you want to edit and a properties dialog will appear:
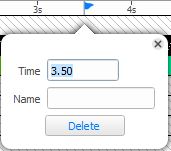
From here you can adjust the flag number, time, and give the flag a name. It's also possible to delete the flag.
Name
The name property of a flag is used within Flag triggers to easily identify the flag rather than using the time that the flag is set at.
Use the Triggers window to determine what these flags will do.
Learn timing
When simulating a single timeline, flags can be dropped interactively after pressing the Add Flag button to enter learn timing mode. Press F to drop a flag at each appropriate playback time then depress the Add Flag button to exit learn timing or click anywhere on the timeline (in which case a final flag will be dropped).
 Loop regions
Loop regions are a programming tool which allow a section of the timeline to repeat during simulation.
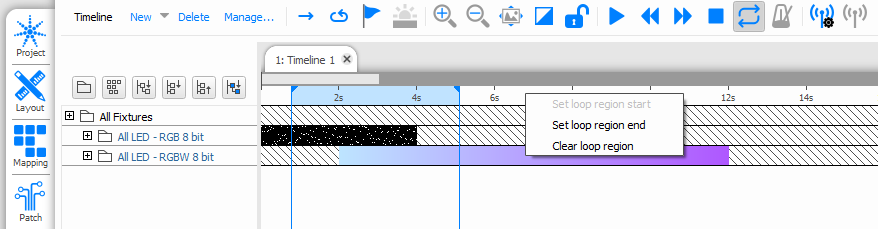
To set a loop region, right-click anywhere in the timeline header to set start and end points. Vertical lines, which can be dragged to adjust their position, indicate the loop region. A loop region can also be set to selected timeline programming by right-clicking and selecting "Set loop region to selection".
Click the Enable Looping button in the toolbar to toggle the loop region on and off.
Loop regions are not sent to the controller as part of upload and do not affect playback.
 Waypoints
To use waypoints, you must set the Time Source of the Timeline to Real Time
A waypoint is an astronomical time which should always display the programming at that point on the timeline. The timeline around the waypoint/s (as shown by the coloured section/s) will be rate shifted to ensure that the correct output is displayed at the specified astronomical time.
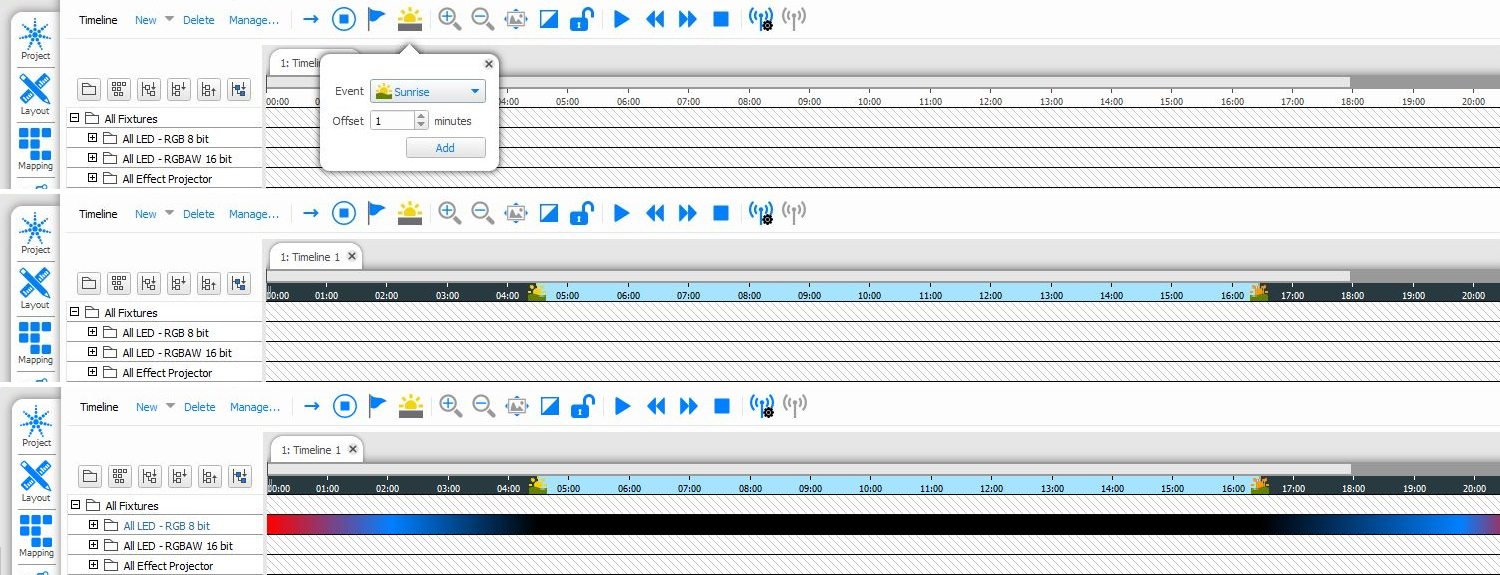
There are various Waypoints available, the same astronomical options available in the Astronomical Trigger:
- Nautical Dawn
- Civil Dawn
- Sunrise
- Sunset
- Civil Dusk
- Nautical Dusk
It is possible to place multiple waypoints in the same range, e.g. the range spans the 24 hour timeline with waypoints for Sunrise and Sunset. This would create three sections within the timeline which would be played back a different rates to ensure that the waypoints are hit at the required astronomical time.
The example above uses a Sunrise Waypoint and a Sunset Waypoint. The timeline will output Red at midnight, crossfading to blue at 3am, then holding blue then crossfading to black at Sunrise. The black output will be held until Sunset, when it will crossfade back to blue, then back to red. The rates of the sections between Midnight, Sunrise, Sunset and Midnight will all be adjusted so that the colours specified at each event are reached at the correct time for the astronomical event. As Sunrise gets earlier, the Midnight to Sunrise section will play back at a greater rate so it takes a shorter time to reach the Sunrise colour (black).
NOTE: To use Waypoints, you must have a Location set for the project.
 /
/ Locking timelines
When clicking on presets to edit their properties it is sometimes all too easy to move or stretch them by accident so it is possible to lock a timeline using the Lock button on the timeline toolbar. When a timeline is locked it is only possible to edit the preset properties, moving or stretching them is prohibited. Press the Lock button again to unlock.